Veri Analistleri İçin Git ve GitHub
Analiz kodunu düzenli tutmak için Git. Repository, commit, branch ve merge kavramlarından bir veri projesini GitHub'a yüklemeye; .gitignore ile neyi dışarıda bırakacağınızdan notebook'ların yarattığı özel soruna kadar.
- Araçlar
- Kariyer
Git ve GitHub aynı şey mi?
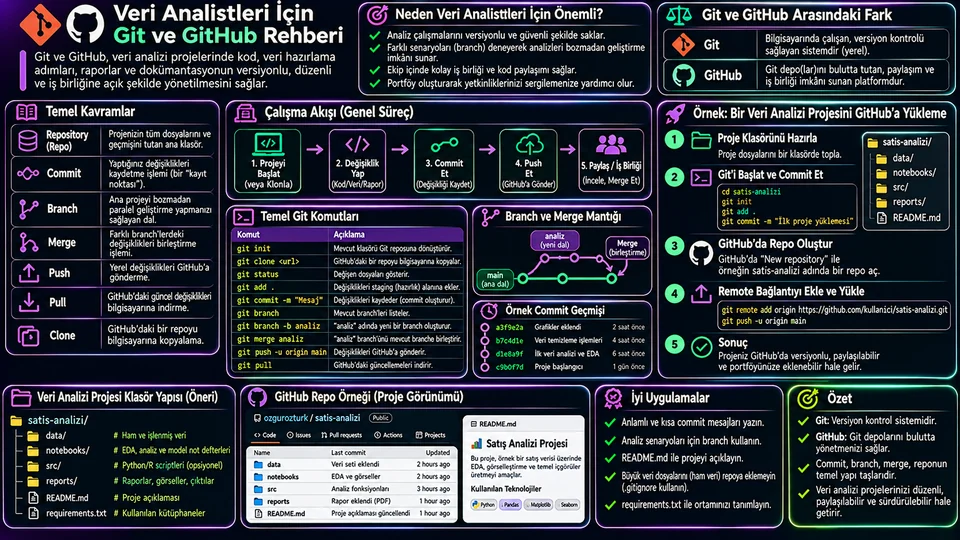
Hayır ve bu ayrım işin başında netleşmeli. Git, dosyalarınızdaki değişiklikleri kendi bilgisayarınızda izleyen dağıtık bir sürüm kontrol sistemidir; internet olmadan da tam olarak çalışır. GitHub ise Git depolarını çevrimiçi barındıran, üzerine kod incelemesi, issue, Pull Request gibi işbirliği özellikleri ekleyen bir platformdur.
Yani Git'i GitHub olmadan kullanabilirsiniz; GitHub'ı Git olmadan kullanamazsınız. Pratikte Git yerelde çalışır, GitHub yedek ve paylaşım katmanıdır.
Temel kavramlar
| Kavram | Ne demek? | Analiz projesinde karşılığı |
|---|---|---|
| Repository (repo) | Proje dosyaları ve tüm değişim geçmişinin tutulduğu alan | Notebook, kod, README, ortam tanımı |
| Commit | Seçtiğiniz değişikliklerin açıklamalı anlık görüntüsü | "Aylık ciro metriğini ekle" |
| Staging | Bir sonraki commit'e girecek değişiklikleri seçtiğiniz ara alan | Notebook'u ekle, ham veriyi dışarıda bırak |
| Branch | Ana geçmişten ayrılan bağımsız çalışma çizgisi | feature/churn-analizi dalında yeni model |
| Merge | Bir daldaki değişiklikleri başka dala birleştirme | İncelenen dalı main'e alma |
| Remote | GitHub gibi uzak bir depo bağlantısı | origin adıyla GitHub deposu |
Buradaki en kritik kavram staging'dir ve Git'i ilk öğrenenlerin en çok takıldığı yerdir. Dosyayı değiştirmek commit yapmaz; git add ile "bunu kaydedeceğim" dersiniz, git commit ile kaydedersiniz. Bu iki aşamalı yapı can sıkıcı görünür ama veri projelerinde tam olarak ihtiyacınız olan şeydir: aynı klasörde duran 200 MB'lık CSV'yi dışarıda bırakıp sadece kodu kaydedebilmenizi sağlar.
Günlük kullanacağınız komutlar
| Komut | Ne yapar? |
|---|---|
git status | Değişen, stage edilen ve izlenmeyen dosyaları gösterir |
git add <dosya> | Belirli dosyayı bir sonraki commit için seçer |
git diff | Henüz stage edilmemiş değişiklikleri gösterir |
git diff --staged | Commit'e girecek olan değişiklikleri gösterir |
git commit -m "..." | Stage edilmişleri açıklamayla kaydeder |
git log --oneline | Kısa commit geçmişini listeler |
git switch -c <dal> | Yeni dal oluşturup ona geçer |
git merge <dal> | Verilen dalı geçerli dala birleştirir |
git pull / git push | Uzaktan alır / yerel commit'leri gönderir |
Pratik bir alışkanlık: commit'ten önce her zaman git status ve git diff --staged çalıştırın. Özellikle git add . yazmaya meyilliyseniz, bu iki komut sizi istemeden eklenmiş bir veri dosyasından kurtarır.
Örnek bir analiz deposu
Dosya düzeni, depoyu ziyaret eden birinin projeyi nasıl çalıştıracağını hızlıca anlamasını sağlar. Aşağıdaki yapı küçük ve orta ölçekli analiz projeleri için fazlasıyla yeterlidir.
satis-analizi/
├── README.md
├── .gitignore
├── requirements.txt
├── data/
│   └── README.md          # veri kaynağı ve indirme yönergesi
├── notebooks/
│   └── 01_aylik_satis.ipynb
├── src/
│   └── analiz.py
└── reports/
    └── .gitkeep
Dikkat edin: data/ klasöründe veri değil, bir README var. Ham veri paylaşılabilir değilse onu depoya koymak zorunda değilsiniz — kaynağını, lisansını, indirme adımlarını ve beklenen sütun yapısını yazmak çoğu zaman yeterlidir. Kodunuz da verinin hangi konumda ve hangi şemada olmasını beklediğini açıkça belirtmeli.
reports/ içindeki .gitkeep küçük bir numaradır: Git boş klasörleri takip etmez, bu boş dosya klasörün yapısını korur.
Neyi depoya koymamalı?
Bu bölüm, veri analistleri için rehberin en önemli kısmı. Bir kez yanlış dosya gönderdiğinizde, onu silmek geçmişten temizlemez — eski commit'lerde durmaya devam eder.
# ham ve özel veri
data/raw/
data/private/
*.csv
*.xlsx
*.parquet

# gizli değerler
.env
*.pem

# üretilmiş dosyalar
__pycache__/
.ipynb_checkpoints/
.venv/
reports/*.png.env.example gibi bir örnek dosyayı gerçek değerler olmadan paylaşın. Yanlışlıkla bir anahtar gönderdiyseniz: önce o anahtarı iptal edip yenisini üretin, sonra geçmişi temizlemeye uğraşın. Sıralama bu yönde olmalı.Boyut tarafında da bir sınır var: GitHub 100 MiB'ı aşan tekil dosyaların normal Git yoluyla gönderilmesini engeller, 50 MiB üzerinde uyarı verir. Büyük veri veya model dosyaları gerekiyorsa Git LFS'i ya da ayrı bir depolama çözümünü değerlendirin.
Adım 1: Projeyi yerelde başlatma
mkdir satis-analizi
cd satis-analizi

git init -b main
# README.md, .gitignore, notebook ve kodu hazırlayın

git status
git add README.md .gitignore requirements.txt notebooks src
git diff --staged          # ne kaydedeceğinizi görün
git commit -m "Satış analizi projesini başlat"
Commit mesajı için işe yarayan bir kural: "Bu commit uygulandığında ..." cümlesini tamamlayacak şekilde, emir kipinde yazın. "Eksik tarih kayıtları için kalite kontrolü ekle" iyi bir mesajdır; "güncelleme" veya "fix" değildir. Altı ay sonra git log okuyan kişi büyük ihtimalle sizsiniz.
Ne zaman commit atmalı? Her küçük denemede değil, anlamlı ve tutarlı bir değişiklik tamamlandığında. İyi bir ölçü: commit mesajını "ve" kullanmadan yazabiliyorsanız, kapsam muhtemelen doğrudur.
README'de olması gerekenler
- Analiz sorusu ve projenin bir paragraflık özeti
- Veri kaynağı, lisansı ve erişim yönergesi (paylaşılmıyorsa açıkça belirtin)
- Python sürümü ve kurulum komutu
- Analizi baştan sona çalıştırma adımları
- Önemli metriklerin tanımı ve yapılan varsayımlar
- Örnek bir çıktı veya grafik
- Kapsam, sınırlılıklar ve iletişim bilgisi
Adım 2: GitHub'a gönderme
- GitHub'da New repository ile yeni bir depo oluşturun; adı ve görünürlüğü (public/private) belirleyin.
- Yereldeki bir projeyi göndereceksiniz: GitHub'da README, .gitignore veya lisans ile otomatik ilk commit oluşturmayın. Aksi hâlde iki ayrı geçmiş oluşur ve ilk push'ta gereksiz bir çakışma yaşarsınız.
- Deponun HTTPS veya SSH adresini kopyalayın.
- Yerelde uzak bağlantıyı tanımlayıp ana dalı gönderin.
git remote add origin https://github.com/KULLANICI/satis-analizi.git
git remote -v
git push -u origin main
-u bayrağı yerel main dalını uzaktaki ile ilişkilendirir; sonraki seferlerde sadece git push yazmanız yeterli olur. Kimlik doğrulama için parolanızı komut satırına yazmayın — SSH anahtarı, kişisel erişim belirteci veya bir credential manager kullanın.
Branch, merge ve Pull Request
Tek başınıza çalışıyor olsanız bile dal kullanmanın bir faydası var: ana dalda her zaman çalışan bir sürüm durur. Yeni bir analiz denemesi işe yaramazsa dalı silersiniz, main hiç etkilenmez.
git switch -c feature/aylik-egilim

# notebook veya kodda aylık eğilim grafiğini ekle
git status
git add notebooks/01_aylik_satis.ipynb
git commit -m "Aylık satış eğilimi grafiğini ekle"
git push -u origin feature/aylik-egilim
GitHub'da bu daldan bir Pull Request açarsınız. PR, değişikliği gözden geçirme, açıklama ekleme ve tartışma alanıdır. Kendi projenizde bile PR açmak işe yarar: değişikliğin tam diff'ini bir arada görmek, commit yaparken fark etmediğiniz şeyleri yakalatır.
git switch main
git pull origin main
git merge feature/aylik-egilim
git push origin main
İki dal aynı satırları farklı şekilde değiştirmişse merge conflict oluşur. Git çakışan bölgeleri dosyada işaretler; hangi hâlin kalacağına siz karar verir, işaretleri silip dosyayı stage eder ve birleştirmeyi tamamlarsınız. Analiz projelerinde çakışma çözdükten sonra kodu bir kez çalıştırın — sözdizimi düzgün görünse de mantık bozulmuş olabilir.
Notebook'lar ve Git: özel bir sorun
.ipynb dosyası JSON'dur ve hücre çıktıları da içinde durur. Bunun iki sonucu var. Birincisi, tek bir hücreyi çalıştırmak bile dosyada yüzlerce satırlık bir fark üretebilir; git diff okunmaz hâle gelir. İkincisi, grafikler base64 olarak gömüldüğü için depo hızla şişer.
Pratik çözümler:
Çıktıları temizleyin
Commit öncesi hücre çıktılarını silin. nbstripout gibi araçlar bunu otomatik yapar.
Mantığı modüle taşıyın
Asıl dönüşümler src/ altındaki .py dosyalarında dursun; notebook onları çağırsın.
Raporu ayrı üretin
Çıktılı sürümü HTML olarak dışa aktarıp reports/ altında tutun, depoya göndermeyin.
Tek notebook, tek konu
Devasa bir notebook yerine numaralı küçük dosyalar çakışma riskini azaltır.
Veri analistleri için pratik notlar
- Tekrarlanabilirlik: Notebook'u baştan sona çalıştırıp temiz sonuç verdiğini doğrulayın; paket sürümlerini
requirements.txtveya bir kilit dosyasıyla sabitleyin. - Örnek veri: Projeyi denenebilir kılmak istiyorsanız küçük, sentetik veya açık lisanslı bir örnek veri koyun. Gerçek veriyi değil.
- Metrik tanımları: Grafiklerin birimini, tarih filtresini ve metrik formülünü README'ye yazın. Kod bunu söylemez.
- Zorlayıcı komutlara dikkat:
git push --forceve geçmişi yeniden yazan komutlar, paylaşılan bir dalda başkalarının çalışmasını silebilir. - Geri alma: Yanlış bir commit'i geri almak için
git revertkullanın; bu yeni bir commit üretir ve geçmişi bozmaz.
Göndermeden önce kontrol listesi
- Depo adı ve README projenin ne yaptığını anlatıyor mu?
- Hassas veri, anahtar, parola veya özel dosya var mı?
.gitignoreveri klasörünü, sanal ortamı ve geçici çıktıları kapsıyor mu?- Notebook baştan sona temiz çalışıyor mu, çıktıları temizlendi mi?
- Paketler ve sürümler belirtilmiş mi?
- Grafikler etiketli, metrik varsayımları yazılı mı?
git statusve staged diff incelendi mi?- Commit mesajı anlaşılır mı, uzak bağlantı doğru mu?
Sonuç
Git öğrenmek, komut ezberlemekten çok bir alışkanlık edinmektir: değişikliği küçük tut, ne yaptığını yaz, göndermeden önce bak. Veri analizinde bunun karşılığı özellikle somuttur — "geçen ay bu rakam neden farklıydı?" sorusunun cevabı commit geçmişinizde durur.
Başlamak için büyük bir proje beklemeyin. Küçük bir açık veri analizi seçin, .gitignore'u baştan yazın, beş on commit atın ve README'yi başkası okuyacakmış gibi doldurun. Bu küçük depo, hem alışkanlığı kazandırır hem de portföyünüzde gösterilebilecek ilk gerçek çalışma olur.
Are Git and GitHub the same thing?
No, and the distinction should be clear from the start. Git is a distributed version control system that tracks changes to your files on your own machine; it works fully without an internet connection. GitHub is a platform that hosts Git repositories online and adds collaboration features such as code review, issues and Pull Requests.
So you can use Git without GitHub; you cannot use GitHub without Git. In practice Git runs locally, and GitHub is the backup and sharing layer.
Core concepts
| Concept | What it means | In an analysis project |
|---|---|---|
| Repository (repo) | Where project files and the whole change history live | Notebook, code, README, environment spec |
| Commit | An annotated snapshot of the changes you selected | "Add monthly revenue metric" |
| Staging | The holding area where you pick what goes into the next commit | Add the notebook, leave the raw data out |
| Branch | An independent line of work split off from the main history | A new model on feature/churn-analysis |
| Merge | Bringing one branch's changes into another | Folding a reviewed branch into main |
| Remote | A link to a remote repository such as GitHub | The GitHub repo under the name origin |
The most critical concept here is staging, and it is where Git beginners get stuck most. Changing a file does not commit it; git add says "I intend to record this", and git commit records it. That two-step structure looks annoying but is exactly what you need in data projects: it lets you leave the 200 MB CSV sitting in the same folder out and record only the code.
The commands you will use daily
| Command | What it does |
|---|---|
git status | Shows changed, staged and untracked files |
git add <file> | Selects a specific file for the next commit |
git diff | Shows changes that are not staged yet |
git diff --staged | Shows exactly what will go into the commit |
git commit -m "..." | Records the staged changes with a message |
git log --oneline | Lists the commit history compactly |
git switch -c <branch> | Creates a new branch and switches to it |
git merge <branch> | Merges the named branch into the current one |
git pull / git push | Fetches from / sends local commits to the remote |
A practical habit: always run git status and git diff --staged before committing. If you are the sort who types git add ., those two commands will save you from an accidentally committed data file.
An example analysis repository
File layout is what lets a visitor work out quickly how to run your project. The structure below is more than enough for small and medium analysis work.
sales-analysis/
├── README.md
├── .gitignore
├── requirements.txt
├── data/
│   └── README.md          # data source and download instructions
├── notebooks/
│   └── 01_monthly_sales.ipynb
├── src/
│   └── analysis.py
└── reports/
    └── .gitkeep
Note that data/ contains a README, not data. If the raw data is not shareable you do not have to put it in the repository — writing down the source, the licence, the download steps and the expected column structure is usually enough. Your code should also state clearly where it expects the data and in what schema.
The .gitkeep inside reports/ is a small trick: Git does not track empty folders, and this empty file preserves the structure.
What should never go into the repository
This is the most important section of the guide for data analysts. Once you push the wrong file, deleting it does not remove it from history — it stays in the older commits.
# raw and private data
data/raw/
data/private/
*.csv
*.xlsx
*.parquet

# secrets
.env
*.pem

# generated files
__pycache__/
.ipynb_checkpoints/
.venv/
reports/*.png.env.example without the real values. If you did push a key by accident: revoke it and issue a new one first, then worry about cleaning history. That order matters.There is a size limit too: GitHub blocks individual files over 100 MiB from a normal Git push and warns above 50 MiB. If you genuinely need large data or model files, look at Git LFS or a separate storage solution.
Step 1: starting the project locally
mkdir sales-analysis
cd sales-analysis

git init -b main
# prepare README.md, .gitignore, the notebook and the code

git status
git add README.md .gitignore requirements.txt notebooks src
git diff --staged          # see what you are about to record
git commit -m "Start the sales analysis project"
A rule that works for commit messages: write them in the imperative, so they complete the sentence "When applied, this commit will ...". "Add a quality check for missing date records" is a good message; "update" or "fix" is not. Six months later, the person reading git log is most likely you.
When should you commit? Not on every small experiment, but when a meaningful, coherent change is finished. A good gauge: if you can write the commit message without the word "and", the scope is probably right.
What a README should contain
- The analysis question and a one-paragraph summary of the project
- Data source, licence and access instructions (say so explicitly if it is not shared)
- Python version and the installation command
- Steps to run the analysis from start to finish
- Definitions of key metrics and the assumptions made
- An example output or chart
- Scope, limitations and contact details
Step 2: pushing to GitHub
- Create a repository on GitHub with New repository; set the name and visibility (public/private).
- Since you are pushing an existing local project, do not let GitHub create an initial commit with a README, .gitignore or licence. Otherwise you end up with two separate histories and an unnecessary conflict on the first push.
- Copy the repository's HTTPS or SSH address.
- Define the remote locally and push the main branch.
git remote add origin https://github.com/USERNAME/sales-analysis.git
git remote -v
git push -u origin main
The -u flag links your local main to the remote one, so later a plain git push is enough. For authentication, do not type your password on the command line — use an SSH key, a personal access token or a credential manager.
Branch, merge and Pull Request
Even working alone, branches earn their keep: the main branch always holds a working version. If a new analysis attempt goes nowhere, you delete the branch and main is untouched.
git switch -c feature/monthly-trend

# add the monthly trend chart in the notebook or code
git status
git add notebooks/01_monthly_sales.ipynb
git commit -m "Add the monthly sales trend chart"
git push -u origin feature/monthly-trend
On GitHub you then open a Pull Request from that branch. A PR is a place to review the change, add explanation and discuss it. Opening one on your own project is still useful: seeing the full diff in one place catches things you missed while committing.
git switch main
git pull origin main
git merge feature/monthly-trend
git push origin main
If two branches changed the same lines differently, you get a merge conflict. Git marks the conflicting regions in the file; you decide which version survives, remove the markers, stage the file and complete the merge. In analysis projects, run the code once after resolving a conflict — the syntax can look fine while the logic is broken.
Notebooks and Git: a special problem
An .ipynb file is JSON, and cell outputs live inside it. That has two consequences. First, running a single cell can produce a diff of hundreds of lines, making git diff unreadable. Second, because charts are embedded as base64, the repository grows fast.
Practical fixes:
Clear outputs
Strip cell outputs before committing. Tools like nbstripout do this automatically.
Move logic into modules
Keep the real transformations in .py files under src/ and have the notebook call them.
Generate the report separately
Export the version with outputs as HTML into reports/ and keep it out of the repo.
One notebook, one topic
Numbered small files instead of one enormous notebook reduces conflict risk.
Practical notes for analysts
- Reproducibility: run the notebook top to bottom and confirm it produces a clean result; pin package versions with
requirements.txtor a lock file. - Sample data: if you want the project to be runnable, include a small synthetic or openly licensed sample. Not the real data.
- Metric definitions: put chart units, the date filter and metric formulas in the README. The code will not tell anyone those.
- Beware forceful commands:
git push --forceand history-rewriting commands can erase other people's work on a shared branch. - Undoing: use
git revertto undo a bad commit; it creates a new commit and leaves history intact.
Checklist before pushing
- Do the repository name and README explain what the project does?
- Is there any sensitive data, key, password or private file in there?
- Does
.gitignorecover the data folder, the virtual environment and temporary output? - Does the notebook run cleanly from the top, and were outputs cleared?
- Are packages and versions stated?
- Are charts labelled and metric assumptions written down?
- Were
git statusand the staged diff reviewed? - Is the commit message clear and the remote correct?
Conclusion
Learning Git is less about memorising commands than about building a habit: keep the change small, write down what you did, look before you push. In data analysis the payoff is unusually concrete — the answer to "why was this figure different last month?" sits in your commit history.
Do not wait for a big project to start. Pick a small open-data analysis, write the .gitignore first, make five or ten commits, and fill in the README as if someone else will read it. That little repository both builds the habit and becomes the first real piece of work you can show.